Wednesday, January 26, 2011

Warm Cooking on the East Coast - French Onion Soup

The snow is still coming down here in Pennsylvania, which means a break from classes and more time indoors.  I take it as the perfect opportunity to warm up the kitchen with some fresh French Onion Soup.

http://img4.myrecipes.com/i/recipes/ck/05/01/french-onion-ck-1011280-l.jpg 

French Onion Soup is one of my favorite dishes.  I make it a point to order it whenever I'm out and it's offered on the menu.  You just can't beat that savory flavor with softened croûtons and melted cheese on top.   But, for a very long time, I thought this perfect combination would be impossible to pull off in my own kitchen.  How could could I make such a delicious broth out of onions - let alone melt cheese on top of a bowl?!  But, this recipe certainly proved me wrong.

Making the perfect French Onion Soup is possible with just a few easy steps that turn basic ingredients into something divine.  This recipe provides simple instructions for making a delicious French Onion Soup, from the savory broth to the melted cheese on top.  While there are more complex recipes out there, I find that it is best to start with the basics and build on those foundations.  This recipe combines the best of both worlds: ease and simplicity with the same rich flavor that complex recipes boast.  Enjoy!  :]

French Onion Soup
Serves 6.

Ingredients:
3 onions
1/4 cup butter
2 14-oz cans beef broth
1 14-oz can chicken broth
salt and pepper
sliced French bread (or croutons)
1.5 cups Fontina or Gruyere cheese, shredded

Method:
1. Peel the onions and cut into 1/8 - 1/4 inch thick rings.
2. Place the butter and onions in a large saucepan.
3. Cook over medium heat for 20 minutes or until the onions begin to brown.
4. Add beef and chicken broth.
5. Let simmer for 30 minutes.
6. Season with salt and pepper to taste.
7. Ladle soup into serving bowls.
8. Top each with a slice of French bread (or croûtons) and sprinkle two tablespoons of cheese over each bread slice.  Put soup bowls under broiler until cheese is melted.
9. Alternatively, place the bread slices on a baking sheet and top each with cheese; broil until cheese has melted, about 30 to 40 seconds, and set on top just before serving.

What are some of your favorite soups?  What do you do differently in your version of French Onion?

For a printable version of this recipe, visit my recipe site at http://wegottaeat.com/Lorrae/recipes/french-onion-soup.

You can find an index to all of my recipes under the "Recipes" section at the top of my blog.

And, if you liked this post, you can follow my blog to recieve free updates by clicking the "Follow" button at the top right of my page, and stay tuned for more!  :]

Saturday, January 15, 2011

Essential Knife Skils Part 2 - Proper Hand Placement and Knife Safety

Note: This is part 2 of a 5-part series that describes a variety of essential knife skills.  See the index under Kitchen Basics for the complete list.

I recently took a course on essential knife skills at a local store, and learned so much more about knives than I bargained for!  I found this class so helpful and want to share all of this information with you, my readers!  The Essential Knife Skills series splits this information into five parts.  This section will cover proper hand placement and knife safety.  A previous post covers different parts of the knife, while future posts will cover how to choose the right knife, maintaining your knives, and various cutting techniques.  A link to each of these sections will be in the index under the "Kitchen Basics" section at the top of my blog. If you haven't yet had a knife course, or even if you have, I am sure you will find this information just as useful and exciting as I have! :]

Proper Hand Placement

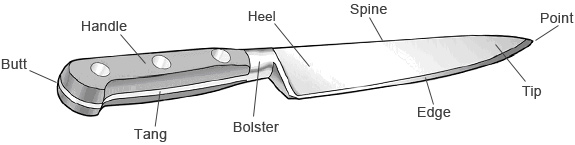
Proper hand placement is essential to use your knife safely and achieve the best cutting results.  It may take some practice to adjust your hands to new positions, but as the knife starts to feel more comfortable in your hand, you will know that you're mastering your skills and cutting techniques.  Described below is the proper way to hold a chef's knife.  The same technique can be applied to other primary knives in your kitchen.
 http://www.finecooking.com/cms/uploadedimages/images/cooking/articles/issues_71-80/FC74kt074-01_ld.jpg

First, grip the handle of the knife with your dominant hand.  Bring your thumb and index finger forward to grip the heel of the knife with the pad of your thumb and side of your index finger.  Angle your index finger downward without dangling it over the edge of the blade.  Most often, your index finger must be curled to achieve this.  This position will give you the most control.
http://www.ifood.tv/files/images/editor/images/master%20knife%20skills.jpg
It may be tempting to rest your index finger over the spine of the knife while cutting, but this is incorrect.  While it feels like you have more control, this position will make it easier for the knife to slip out from under your hands while cutting, which increases the chance of injury.  Always hold your thumb and index finger securely on the heel of the knife to prevent slipping and loss of control.

 
Your non-dominant hand is used to secure the food being cut.  Grip the top of the food with the tips of your fingers and curl your knuckles over to act as a shield.  With your finger tips tucked away, you will not run the risk accidental injury.  This technique can also be used to guide your knife with precision and consistency, as the knife rests on the edge of the knuckles.  Do not let your fingertips drift in front of your knuckles, as it will expose them to the blade of the knife. 
http://i.ehow.com/images/a05/20/l1/use-chefs-knife-properly-safely-1.3-800X800.jpg

When cutting smaller items, such as herbs or cherry tomatoes, an alternative to this technique may be necessary in order to grip the food.  For this, align your fingertips parallel to the knife and position your upper fingers in a slight angle, as shown below.  In this way, you can chop with security and control in tighter circumstances.
http://skinnychef.us/misc/how-to-use-a-knife350_313.jpg
Knife Safety

Aside from proper hand placement, there are a few techniques which can help to ensure knife safety during use and handling.  These tips are crucial to remember when in the kitchen.

 1. A sharp knife is a safe knife.  A dull knife requires more force when cutting, which can result in slips or accidental injury.  Keeping your knife sharp will reduce knife tension while cutting and increase control.  Plus, any accidental injuries caused my a sharp knife will be clean and easier to care for.

2. Always cut on a proper cutting board.   Cutting on glass, metal, or marble will damage a knife's edge, and many counter-tops increase the risk of slips.  Cutting boards made of wood, pressed wood, or plastics are ideal and durable.  These surfaces are soft and create grooves, reducing the risk of slips and knife damage.

https://blogger.googleusercontent.com/img/b/R29vZ2xl/AVvXsEhWIi8FPKbYGkH_YmZW27sOH-koMolhvbYaKeITQ-ibVPYjFwt0aPNO3XmfzvSa0PDaWkApRnz25Pk254AmvHj6wdGPci4WB-riIRQSHHp1EKVoWDCZdxnhXVSam3FLFBi7knjLQbmuXn5M/s400/epicurean+board+1+copy.jpg
3. Never, ever grab a falling knife.  It is important to keep your knife on your cutting surface, with the handle and tip of your knife far from counter edges.  Under no circumstances should your knife be dangling over the edge.  However, occasionally a knife may slip, be bumped, or otherwise fall from your work surface.  If this happens, resist the urge to grab your knife!  As I learned in class, "a falling knife has no handle".  Instead, quickly move your hands and feet to avoid the trajectory of the knife.

4. Carry a knife properly.  Carrying a knife can become problematic, especially in a busy kitchen.  The best way to hold a knife is with the blade pointing straight down and facing your thigh.  Make sure to keep your arm stiff until you reach your cutting surface. 

5. Keep your eyes on the blade.  Whether carrying or cutting, watching where your blade is will magnify your control and nearly eliminate the chance of injury.

6. Always cut away from - never towards - yourself.  It may be tempting to rotate your blade to get the perfect angle on the object you're cutting.  However, if you need to rotate your blade more than forty-five degrees in any direction, it is much safer, and easier, to rotate your food or cutting board instead.

http://www.focusonfood.org/images/tech2.jpg
7. Never put your knife in a sink full of water.  As soon as you lose sight of your knife in the sink, you expose yourself to potential injury.  Instead, wash your knives by hand, starting at the spine and moving to the edge of the blade.  Dry and store your knives immediately.  Never place your knives in the dishwasher.

8. Use the right knife for the right job.  In the next section, I will cover how to choose the right knife - both for the job at hand and your particular needs in the kitchen.  Using the correct knife for the job will reduce risk of injury, as a chef's knife is certainly not meant for boning, nor is a boning knife great for chopping foods.  It is equally important to find a set of knives which are durable and comfortable for you to use

If you enjoyed this post, you can follow my blog to receive free updates by clicking the "Follow" button at the top right of my page, and stay tuned for more!  :]

You can find an index to the Essential Knife Skills series, and more Kitchen Basics, under the "Kitchen Basics" section at the top of my blog.

Next: Choosing the Right Knife

Essential Knife Skills Part 1 - Parts of the Knife

Note: This is part 1 of a 5-part series that describes a variety of essential knife skills.  See the index under Kitchen Basics for the complete list.

I recently took a course on essential knife skills at a local store, expecting to learn a few basic cuts and safety precautions.  But, I learned so much more about knives than I bargained for!  First, we covered the safe handling and parts of the knife.  These basics were a great foundation to learning different kinds of knives, each with a different purpose and style in mind.  Next was the storage and sharpening of knives, where I learned how to properly care for my knives and maintain sharpness (which means better safety and ease of cuts).  Finally, we got the chance to practice a variety of basic and specialty cutting techniques on an assortment of vegetables, fruits, and breads.  (Meat and fish cuts are taught in another course.)

http://ak2.ostkcdn.com/img/mxc/091019_cooking-knives.jpg

I found this class so helpful and want to share all of this information with you, my readers!  But, it is way too much to put into one post, so I'm splitting the information into a five-part series.  This section will cover the different parts of the knife.  In future posts, I will cover knife safety and proper hand placement, how to choose the right knife, maintaining your knives, and I'll detail the cutting techniques I learned in class.  A link to each of these sections will be in the index under the "Kitchen Basics" section at the top of my blog.  If you haven't yet had a knife course, or even if you have, I am sure you will find this information just as useful and exciting as I have!  :]

Parts of the Knife

Each part of a knife has a specific purpose, and knowing how to use it properly will greatly reduce your chance of injury and improve your cutting technique.  This section will describe each part of the knife, its purpose, and a few hand placement guidelines during use!

http://www.webstaurantstore.com/site_images/knife_guide/knife-parts.jpg

1. The Point - The point is located at the front of the blade.  It is used as a piercing tool to begin the cut.

2. Knife Tip - The tip consists of the front quarter of the blade, including the point.  It does most of the work when cutting and separating, and is best used for smaller foods and cuts, such as when mincing garlic or chopping cherry tomatoes.

3. Cutting Edge - This is the working part of the blade which extends from point to heel.  It is often the first part of the blade to get dull, as it is used to cut the majority of foods.  The edge is used for long slicing motions, pushing slightly forward with each slice, and can produce large chops or delicate slices.  Your hand should touch the point, tip, or edge.

4. The Spine - The top of the knife, opposite of the cutting edge.  When cutting large of tough foods, such as boiled potatoes or melons, the palm of your non-dominant hand can rest on the spine to provide extra power and control.  Never rest the fingers of your dominant, cutting hand over the spine.

5. The Heel - Rear part of the cutting edge, used to cut large or tough foods when extra force and weight is needed.  The thumb and index finger of your dominant hand grip the heel for maximum control when cutting, as described in later posts.

6. The Bolster - Forged knives will have a bolster, a thick steel band of which shows that the blade is made from one piece of steel which runs throughout the length of the knife.  This helps balance the knife and protect the hand from accidental slips across the blade.  Forged knives are easily sharpened and maintained, and offer the most balance, weight, and control during cutting

Two examples of forged knives.
Stamped knives do not have a bolster, so the handle is attached to the blade during the manufacturing process.  Stamped knives are lighter less expensive, but are difficult to sharpen and do not hold their edge for very long.  They are also prone to breakage and slips due to their lack of balance and weight. 

An example of a stamped knife.


Forged and stamped images from:
http://cdn5.mydeco.com/product_images/full/4f4f41175089399a86f77e08781409fdd070375d.jpg
http://www.yourhomedepot.com.au/getimage.php?src=images/product/2907_1_thumbnail_2.jpg
http://www.cooking-made-easy.com/images/victorinox_fibrox_cooks_knife.jpg

7. The Tang - The portion of the blade which extends through the handle of forged knives, designed to have the knife its balance and durability.

8. The Handle - This is the part of the knife which we grip.  It is typically made out of wood or plastics.

9. Butt - The very end of the knife.

I feel that this information is the foundation for other knife skills.  Knowing the parts of a knife will be very helpful when learning about proper hand placement while cutting, choosing the right knife for you, maintaining and sharpening knives, and especially, cutting techniques.  Please leave me a comment with any questions you may have or topics you'd be interested in for future posts!

If you enjoyed this post, you can follow my blog to receive free updates by clicking the "Follow" button at the top right of my page, and stay tuned for more!  :]

You can find an index to the Essential Knife Skills series, and more Kitchen Basics, under the "Kitchen Basics" section at the top of my blog.

Next: Proper Hand Placement and Knife Safety

Wednesday, January 12, 2011

Winter Weather Means Soup! Hearty Minestrone

With the cold weather sweeping the nation, I thought it'd be the perfect time to make some nice hot soup to warm up the kitchen.  Tonight, I made an Italian classic - Hearty Minestrone.  This soup has always been a family-favorite, but my recipe is much easier than the ones made by my ancestors.  This version of Minestrone uses canned and frozen foods for ease, but the convenience doesn't take away this soup's fresh flavor.

Until I get a camera of my own, this almost-perfect match will have to do!
http://www.itakios.com/blog/wp-content/uploads/2010/03/minestrone_soup.jpg

I find this dish to be so comforting, and it always reminds me of home.  The tomato-beef broth has a very natural flavor, while the vegetables and beans give me that healthy edge I love.  My family members and friends have found this soup irresistible in the past, and my parents were incredibly happy to have it warm their palate tonight!  I know that this soup will be a tradition in my family for years to come, and a recipe I will one day make for my own children.  Enjoy!  :]

Hearty Minestrone
Serves 6.

Ingredients:
2 14-oz cans beef broth
1 15-oz can kidney beans (drained)
1 10-oz pkg frozen mixed vegetables
1 small onion (chopped)
3/4 cup ditalini pasta
1 tsp dried basil
1/4 tsp black pepper
1 zucchini (sliced and cut in 4ths)
1 14-oz can Italian-style stewed tomatoes (drained into soup, then chopped)

Method:
1. Combine broth, beans, veggies, onion, pasta, basil, and pepper in a 3 Qt saucepan and mix well.
2. Bring to a boil and reduce to medium heat.
3. Cook covered for 10 minutes, stirring occasionally.
4. Stir in zucchini and tomatoes as specified in the ingredients.
5. Cook covered until heated through (7-10 minutes).

Notes:
Bean Tip:  Run the beans in cold water and let them soak for 5 minutes with a Tbsp of fresh lemon juice for a fresher taste.
Substitution:  To make it a meal, use chicken broth and add 1 lb chopped cooked chicken with the zucchini and tomatoes.

What are some of your favorite recipes for the winter?

For a printable version of this recipe, visit my recipe site at http://wegottaeat.com/Lorrae/recipes/hearty-minestrone.

You can find an index to all of my recipes under the "Recipes" section at the top of my blog.

And, if you liked this post, you can follow my blog to recieve free updates by clicking the "Follow" button at the top right of my page, and stay tuned for more!  :]

Tuesday, January 11, 2011

Welcome to The Pink Palate!

Hey everyone! :]  Welcome to The Pink Palate.

I'm starting this blog to share my adventures in the kitchen and recipes as I learn how to cook, bake, and create all things "foodie". 

I've been cooking for the last year and a half, starting in the summer of 2009.  My first creation was embarrasingly simple (mini-cupcakes made of brownie mix with peanut butter cups in the center), but that easy project sparked my interest into a whole new world of culinary creation.  I've been learning and exploring ever since, and now, I can conquer more complicated dishes with ease.

I bake.  I cook.  I preserve...  and I learn as I go along.  I hope that I can share my excitement with you and you will join me on my food journey!  :]

If you're enjoying my blog, you can follow me to recieve free updates by clicking the "Follow" button at the top right of my page! :]